Build for Solana
Build and publish full-stack DApps on Solana
CodeNut supports building and deploying Solana programs (smart contracts) and dApps. This guide highlights the key differences from EVM development.
Quick Differences: Solana vs EVM
| Aspect | EVM | Solana |
|---|---|---|
| Smart Contracts | Solidity contracts | Rust programs (via Anchor) |
| Interface Definition | ABI (JSON) | IDL (JSON) |
| Deployment | Direct from wallet | Via deployment wallet + program loader |
| Faucet | Built-in testnet faucet | External Solana Faucet |
| Networks | Multiple chains (Ethereum, Base, Arbitrum, etc.) | Devnet, Testnet, Mainnet |
1. Getting Started
Wallet Connection
CodeNut provides a unified wallet experience through Reown AppKit (formerly WalletConnect). The platform automatically detects whether you're connecting an EVM or Solana wallet.
Supported Solana Wallets:
- Phantom
- Solflare
- Backpack
- And other Solana-compatible wallets
Authentication uses SIWS (Sign-In with Solana), similar to SIWE for Ethereum.
Getting Test SOL
Unlike EVM where CodeNut provides an internal faucet, for Solana DevNet Gas (SOLs), please use the official Solana Faucet:
- Navigate to Contract Status → DevNet Faucet
- Click the Solana Faucet button to open faucet.solana.com
- Request SOL for your wallet address on devnet
2. Building dApp for Solana
Building programs (smart contracts)
When requested to build apps for solana. CodeNut's AI agent will normally start with the smart contract (programs) first, where the agent:
- Initializes a proper project structure for Solana
- Writes program code in Rust (
contracts/programs/my-program/src/lib.rs) - Generates comprehensive tests
- Runs tests to validate functionality
- Provides deployment instructions
Building frontend UI
After the program is generated and deployed to the Solana DevNet, the CodeNut agent will start building frontend for the app. Here the agent will have full knowledge of the smart contracts (programs) and the UI code will be built, including:
- Choose correct component (like wallet) for Solana ecosystem
- Add proper interaction with the on-chain program
- Create other frontend logic needed for the app
3. Deployment Process
Understanding Solana Deployment
Solana deployment differs significantly from EVM:
- Deployment Wallet: An ephemeral keypair is created in your browser to handle the deployment process
- Funding: You transfer SOL from your main wallet to the deployment wallet
- Program Upload: The program is uploaded in chunks to Solana using the BPF Upgradeable Loader
- Authority Transfer: Program authority is set back to your main wallet
Step-by-Step Deployment
Connect Your Solana Wallet
Ensure you have sufficient SOL for deployment (~0.5-3 SOL depending on program size)
Start the deployment
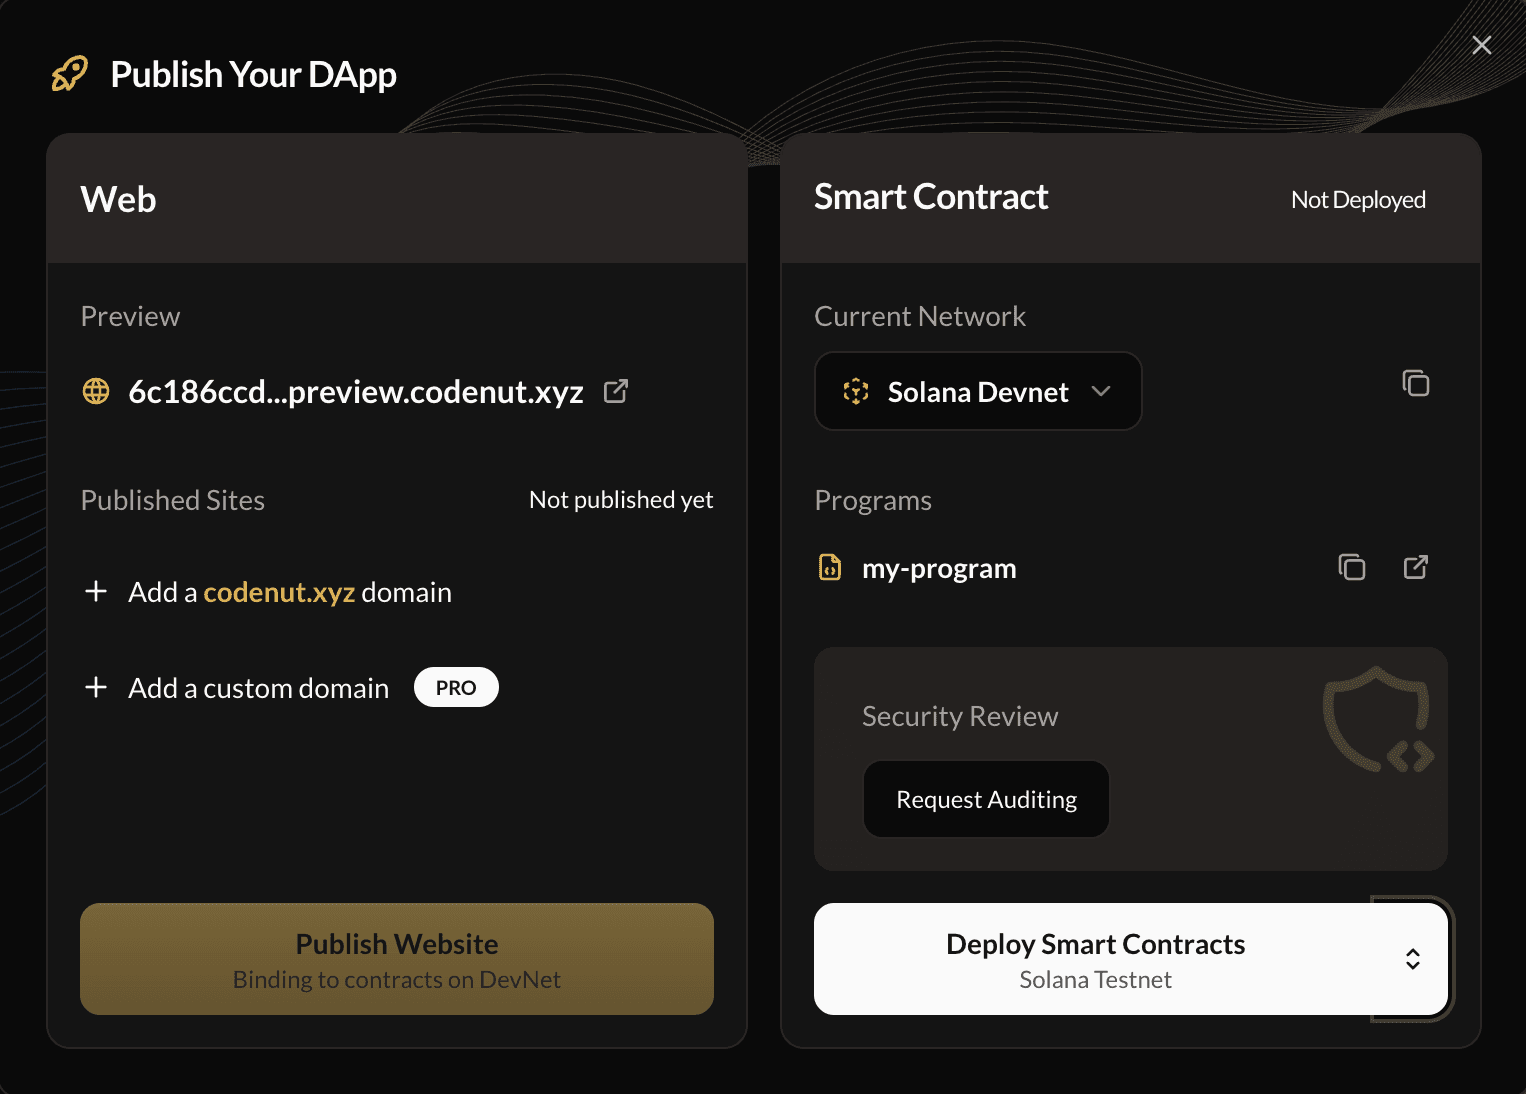
- Select the target network (Testnet or Mainnet) and click the Deploy button in the Publish Dialog
- On the next screen, you will have a summary for the deployment including the deployment wallet address and the estimated gas fee.
- Click Continue
Generate Deployment Wallet
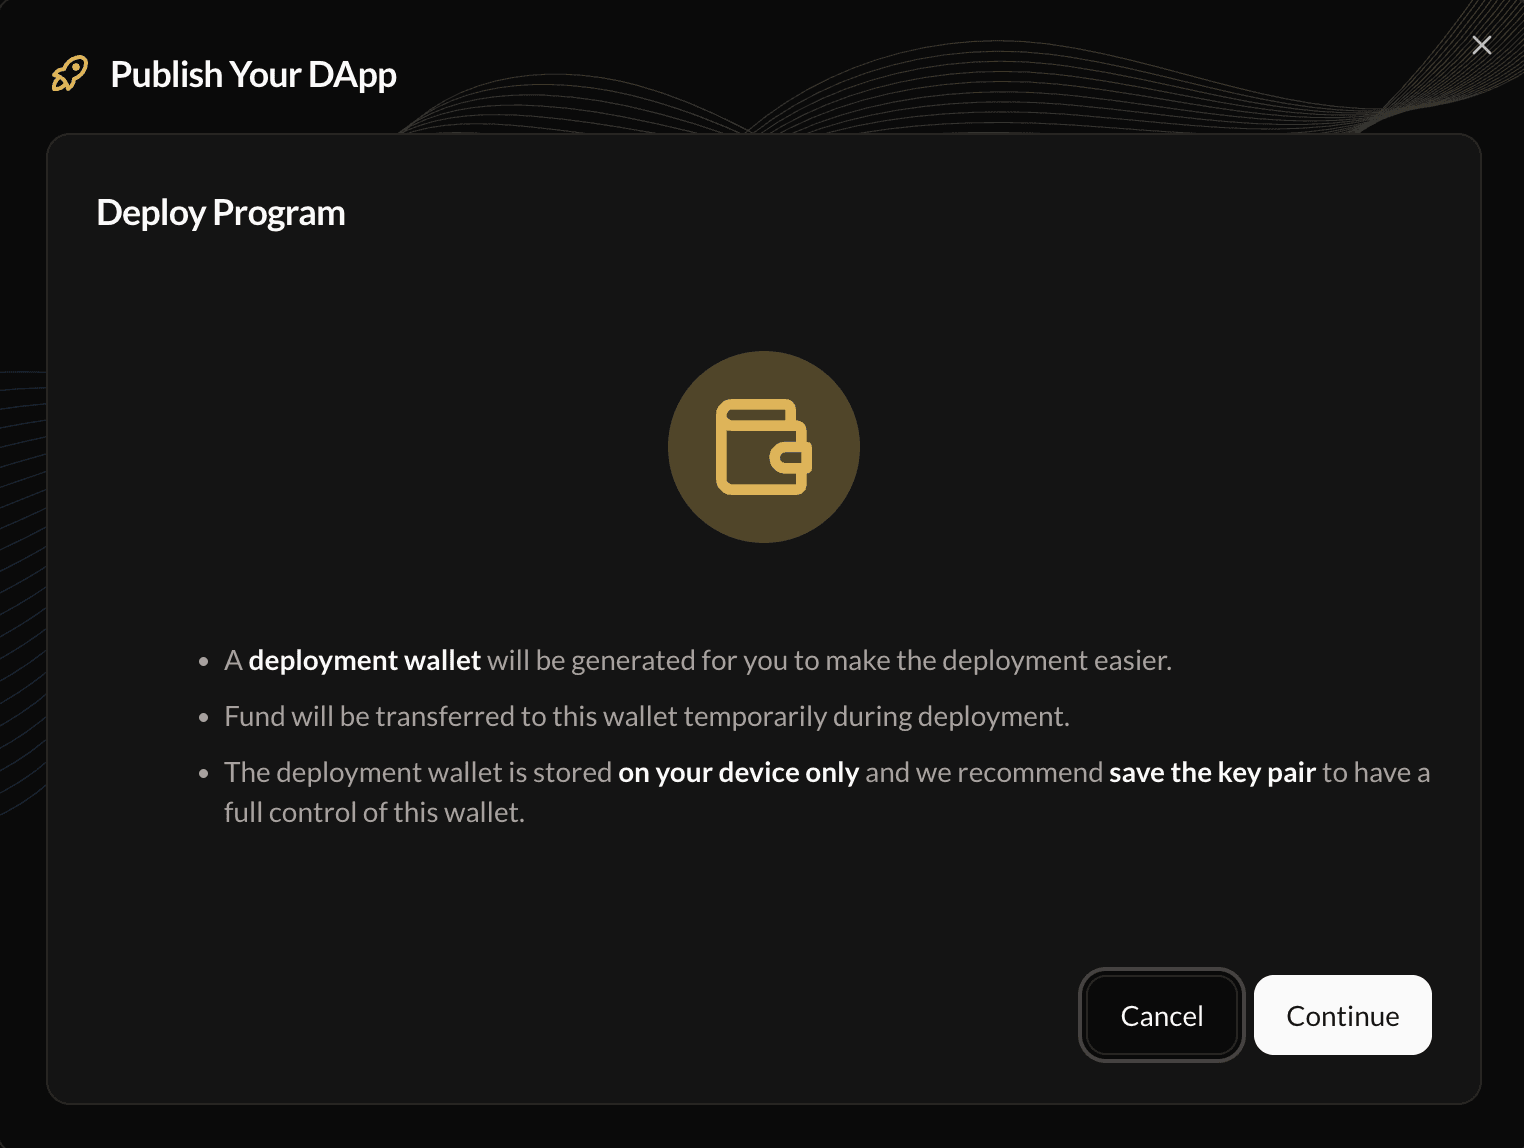
- If you have not generated a deployment wallet before, a new deployment wallet will be generated for you. Otherwise the existing deployment wallet will be used.
- Click "Continue" to create the wallet
- When the wallet is created the first time, you need to download and save the
keypair.jsonfile (so you can import it to your wallet app and maintain full control of the wallet) - Click "Continue" again (after you downloaded the keypair file) to start the deployment process
The deployment wallet is only used for the deployment process. It is created and stored only in your local device (in browser). CodeNut does not store any information of the wallet. You need to save the kaypair info to maintain full control of the wallet.
Fund Deployment Wallet
During the deployment process you will be notified to sign a transaction to fund the deployment wallet.
Deploy Program
The system handles the 5-step deployment process:
- Transfer funds to deployment wallet
- Create buffer account
- Upload program data in chunks
- Set program authority to your wallet
- Finalize deployment
You will be prompted one more time to sign a transaction to finalize the deployment.
View Results
After a successful deployment, you can find the following information in the Publish/Deployment dialog,
- Program ID and transaction hash displayed
- Link to open the deployed program address in Solscan explorer
4. Network Configuration
Available Networks
| Network | Purpose | RPC Endpoint |
|---|---|---|
| Devnet | Development & testing | https://api.devnet.solana.com |
| Testnet | Pre-production testing | https://api.testnet.solana.com |
| Mainnet-Beta | Production | https://api.mainnet-beta.solana.com |
Network Selection
Network selection happens during deployment. Once deployed, your program ID remains constant for that network.
5. Resources
- Anchor Documentation: anchor-lang.com
- Solana Cookbook: solanacookbook.com
- Solana Explorer: solscan.io
- Solana Faucet: faucet.solana.com
Next Steps
- Connect your Solana wallet
- Request the AI to build a Solana program
- Fund your wallet with devnet SOL from the faucet
- Deploy to devnet and test
- Deploy to mainnet when ready